이전이야기
지난 두편을 통해 컴파일러의 진입점과 캐싱방법인 useMemoCache에 대해서 알아보았다. 이번 부터는 컴파일러가 어떤 과정들을 통해서 구문 분석을 하고 컴파일을 하는지 알아보도록 하자.
1편에서 살펴봤던 실질적으로 컴파일을 진행하는 함수인 compileFn을 다시 살펴보자.
export function compileFn(
  func: NodePath<
    t.FunctionDeclaration | t.ArrowFunctionExpression | t.FunctionExpression
  >,
  config: EnvironmentConfig,
  fnType: ReactFunctionType,
  useMemoCacheIdentifier: string,
  logger: Logger | null,
  filename: string | null,
  code: string | null
): CodegenFunction {
  let generator = run(
    func,
    config,
    fnType,
    useMemoCacheIdentifier,
    logger,
    filename,
    code
  );
  while (true) {
    const next = generator.next();
    if (next.done) {
      return next.value;
    }
  }
}
compileFn 함수는 run 함수를 통해 코드를 생성하고, generator.next()를 통해 코드를 생성하는 과정을 반복한다.
// packages/babel-plugin-react-compiler/src/Entrypoint/Pipline.ts
export type CompilerPipelineValue =
  | { kind: "ast"; name: string; value: CodegenFunction }
  | { kind: "hir"; name: string; value: HIRFunction }
  | { kind: "reactive"; name: string; value: ReactiveFunction }
  | { kind: "debug"; name: string; value: string };

export function* run(
  func: NodePath<
    t.FunctionDeclaration | t.ArrowFunctionExpression | t.FunctionExpression
  >,
  config: EnvironmentConfig,
  fnType: ReactFunctionType,
  useMemoCacheIdentifier: string,
  logger: Logger | null,
  filename: string | null,
  code: string | null
): Generator<CompilerPipelineValue, CodegenFunction> {
  const contextIdentifiers = findContextIdentifiers(func);
  const env = new Environment(
    fnType,
    config,
    contextIdentifiers,
    logger,
    filename,
    code,
    useMemoCacheIdentifier
  );
  yield {
    kind: "debug",
    name: "EnvironmentConfig",
    value: prettyFormat(env.config),
  };
  const ast = yield* runWithEnvironment(func, env);
  return ast;
}
run 함수는 Environment를 생성하고, runWithEnvironment 함수를 통해 코드를 생성한다.
Environment는 컴파일 과정에서 전역적인 상태와 설정을 관리하는 객체이다.
이에 대한 자세한 내용은 다음에 살펴보도록 하고, 일단 넘어가자.
이제 runWithEnvironment 함수를 살펴보자.
실질적으로 코드를 생성하는 함수이다.
runWithEnvironment
// packages/babel-plugin-react-compiler/src/Entrypoint/Pipline.ts
function* runWithEnvironment(
  func: NodePath<
    t.FunctionDeclaration | t.ArrowFunctionExpression | t.FunctionExpression
  >,
  env: Environment
): Generator<CompilerPipelineValue, CodegenFunction> {
  const hir = lower(func, env).unwrap();
  yield log({ kind: "hir", name: "HIR", value: hir });

  pruneMaybeThrows(hir);
  yield log({ kind: "hir", name: "PruneMaybeThrows", value: hir });

  validateContextVariableLValues(hir);
  validateUseMemo(hir);

  dropManualMemoization(hir);
  yield log({ kind: "hir", name: "DropManualMemoization", value: hir });

  // ~~~~~~~~~~~~~~~~~~~~~
  // --- 중간 여러 과정들 ---
  // ~~~~~~~~~~~~~~~~~~~~~

  const ast = codegenFunction(reactiveFunction, uniqueIdentifiers).unwrap();
  yield log({ kind: "ast", name: "Codegen", value: ast });

  /**
   * This flag should be only set for unit / fixture tests to check
   * that Forget correctly handles unexpected errors (e.g. exceptions
   * thrown by babel functions or other unexpected exceptions).
   */
  if (env.config.throwUnknownException__testonly) {
    throw new Error("unexpected error");
  }

  // 최종적으로 생성된 코드를 반환
  return ast;
}
전체 과정은 약 40개 정도의 과정을 거치며 코드를 생성한다.
각 과정을을 우선 크게 분류해보면 다음과 같다.
- ‘Lowering’: AST를 HIR(High-level Intermediate Representation)로 변환
- ’Normalization, Optimization’ : HIR을 정규화하고 최적화하는 과정
- ’Static Analysis, Type Inference’ : SSA 형태로 변환하고 타입 추론
- ’Reactive Optimization’ : 반응성 최적화
- ’Code Generation’ : 코드 생성
더 세부적으로 펼쳐보면 다음과 같다.
아직 깊게 들여다보진 말고 어떤 과정들이 있는지만 훑어보자.
-
‘Lowering’
lower: AST를 HIR로 변환
-
’최적화 및 정규화’
pruneMaybeThrows: HIR에서MaybeThrows를 제거validateContextVariableLValues: HIR에서 Context 변수의 LValues를 검증validateUseMemo: HIR에서useMemo를 검증dropManualMemoization: 수동으로 메모이제이션을 제거inlineImmediatelyInvokedFunctionExpressions: 즉시 호출 함수 표현식(IIFE)을 인라인화mergeConsecutiveBlocks: 연속된 블록을 병합
-
’정적 분석 및 타입 추론’
enterSSA: SSA(Static Single Assignment) 형태로 변환eliminateRedundantPhi: 중복된 Phi 노드 제거constantPropagation: 상수 전파inferTypes: 타입 추론validateHooksUsage: 훅 사용의 유효성 검사validateNoCapitalizedCalls: 대문자로 시작하는 함수 호출 검사analyseFunctions: 함수 분석inferReferenceEffects: 참조 효과 추론deadCodeElimination: 데드 코드 제거inferMutableRanges: 가변 범위 추론inferReactivePlaces: 반응형 장소 추론leaveSSA: SSA형태에서 일반적인 형태로 복귀
-
’반응형 최적화(HIR)‘
inferReactiveScopeVariables: 반응형 스코프 변수 추론alignMethodCallScopes: 메서드 호출 스코프 정렬alignObjectMethodScopes: 객체 메서드 스코프 정렬memoizeFbtOperandsInSameScope: 동일한 스코프 내 Fbt 피연산자 메모이제이션pruneUnusedLabelsHIR: 사용되지 않는 레이블 제거alignReactiveScopesToBlockScopesHIR: 반응형 스코프를 블록 스코프에 정렬mergeOverlappingReactiveScopesHIR: 겹치는 반응형 스코프 병합buildReactiveScopeTerminalsHIR: 반응형 스코프 단말 생성buildReactiveFunction: 반응형 함수 생성
-
’반응형 최적화 (Reactive function)‘
pruneUnusedLabels: 사용되지 않는 레이블 제거flattenReactiveLoops: 반응형 루프 평탄화propagateScopeDependencies: 스코프 의존성 전파pruneNonReactiveDependencies: 비반응형 의존성 제거pruneUnusedScopes: 사용되지 않는 스코프 제거mergeReactiveScopesThatInvalidateTogether: 함께 무효화되는 반응형 스코프 병합pruneAlwaysInvalidatingScopes: 항상 무효화되는 스코프 제거propagateEarlyReturns: 조기 반환 전파promoteUsedTemporaries: 사용된 임시 변수 프로모션pruneUnusedLValues: 사용되지 않는 LValue 제거extractScopeDeclarationsFromDestructuring: 해체에서 스코프 선언 추출stabilizeBlockIds: 블록 ID 안정화renameVariables: 변수 이름 변경pruneHoistedContexts: 호이스팅된 컨텍스트 제거
-
’Code Generation’
codegenFunction: 최종 코드 생성
과정들을 다 살펴볼지는 모르겠지만, 우선 시작해보자.
Lowering
const hir = lower(func, env).unwrap();
리액트 컴파일러의 첫 번째 단계인 Lowering은 AST(Abstract Syntax Tree)를 HIR(High-level Intermediate Representation)로 변환하는 과정이다.
먼저 컴파일에 대해 다시 집고 넘어가보자.
to collect information from different places and arrange it in a book, report, or list
[Cambridge Dictionary]
사전적 의미로는 다양한 정보를 수집하여 책, 보고서 또는 목록으로 정리하는 것을 의미한다.
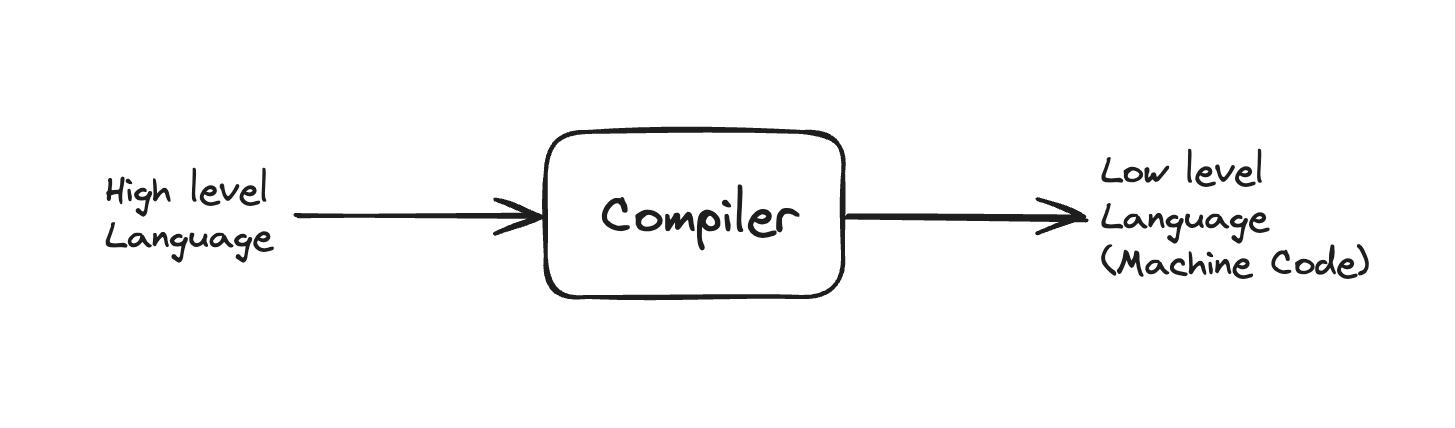
컴퓨터 과학에서 컴파일은 소스 코드를 기계어로 변환하는 과정을 의미한다.
기계어로 바꾼다. 쉽게 말해, 컴퓨터가 이해할 수 있는 언어로 바꾼다는 것이다.
소스코드에서 바벨에 의해 AST로 변환되었고 이 AST를 한단계 더 낮춰 중간표현(IR)으로 변환 하였기에 Lowering이라고 부른다.
그럼 HIR로 바꿔주는 lower 함수를 살펴보자.
// packages/babel-plugin-react-compiler/src/HIR/BuildHIR.ts

 /*
  * 함수를 제어 흐름 그래프(Control-Flow Graph, CFG)로 나타내는 고수준 중간 형태(HIR)로 변환합니다.
  * 모든 정상 제어 흐름은 정확하게 모델링되어 정확한 표현수준(expression-level)의 메모이제이션을 허용합니다.
  * 주요 예외는 try/catch 문과 예외입니다.
  * 현재 try/catch를 위해 컴파일을 건너뛰고 예외의 제어 흐름을 모델링하려고 시도하지 않습니다.
  * 이는 JavaScript의 어디에서나 발생할 수 있는 예외입니다.
  * 컴파일러는 예외가 런타임에 의해 처리될 것으로 가정하며,
  * 즉 메모이제이션을 무효화함으로써 처리될 것으로 가정합니다.
  */
export function lower(
  func: NodePath<t.Function>,
  env: Environment,
  bindings: Bindings | null = null,
  capturedRefs: Array<t.Identifier> = [],
  // 재귀적으로 호출되는 경우(람다 함수의 경우) lower()를 호출하는 가장 바깥쪽 함수
  parent: NodePath<t.Function> | null = null
): Result<HIRFunction, CompilerError> {
// ...
}
함수 위의 주석을 참고해보면, AST(Abstract Syntax Tree)를 CFG(Control-Flow Graph 이하 CFG)로 나타내는 고수준 중간 표현(HIR)로 변환한다고 한다.
AST는 구문 트리로, 프로그램의 구문을 나타내는 트리 형태의 자료구조인 반면, CFG는 제어 흐름 그래프로, 프로그램의 제어 흐름을 나타내는 그래프 형태의 자료구조이다.
그래프의 각 노드는 기본 블록(Basic Block)이라고 하는 코드의 연속적인 부분을 나타내며, 엣지(edge)는 한 기본 블록에서 다른 기본 블록으로의 제어 흐름을 나타 낸다.
제어 흐름 구조란, if/else, switch, loop와 같은 분기와 반복을 의미한다.
CFG는 프로그램의 모든 가능한 실행 경로를 포착하여 코드 최적화와 분석에 사용된다.
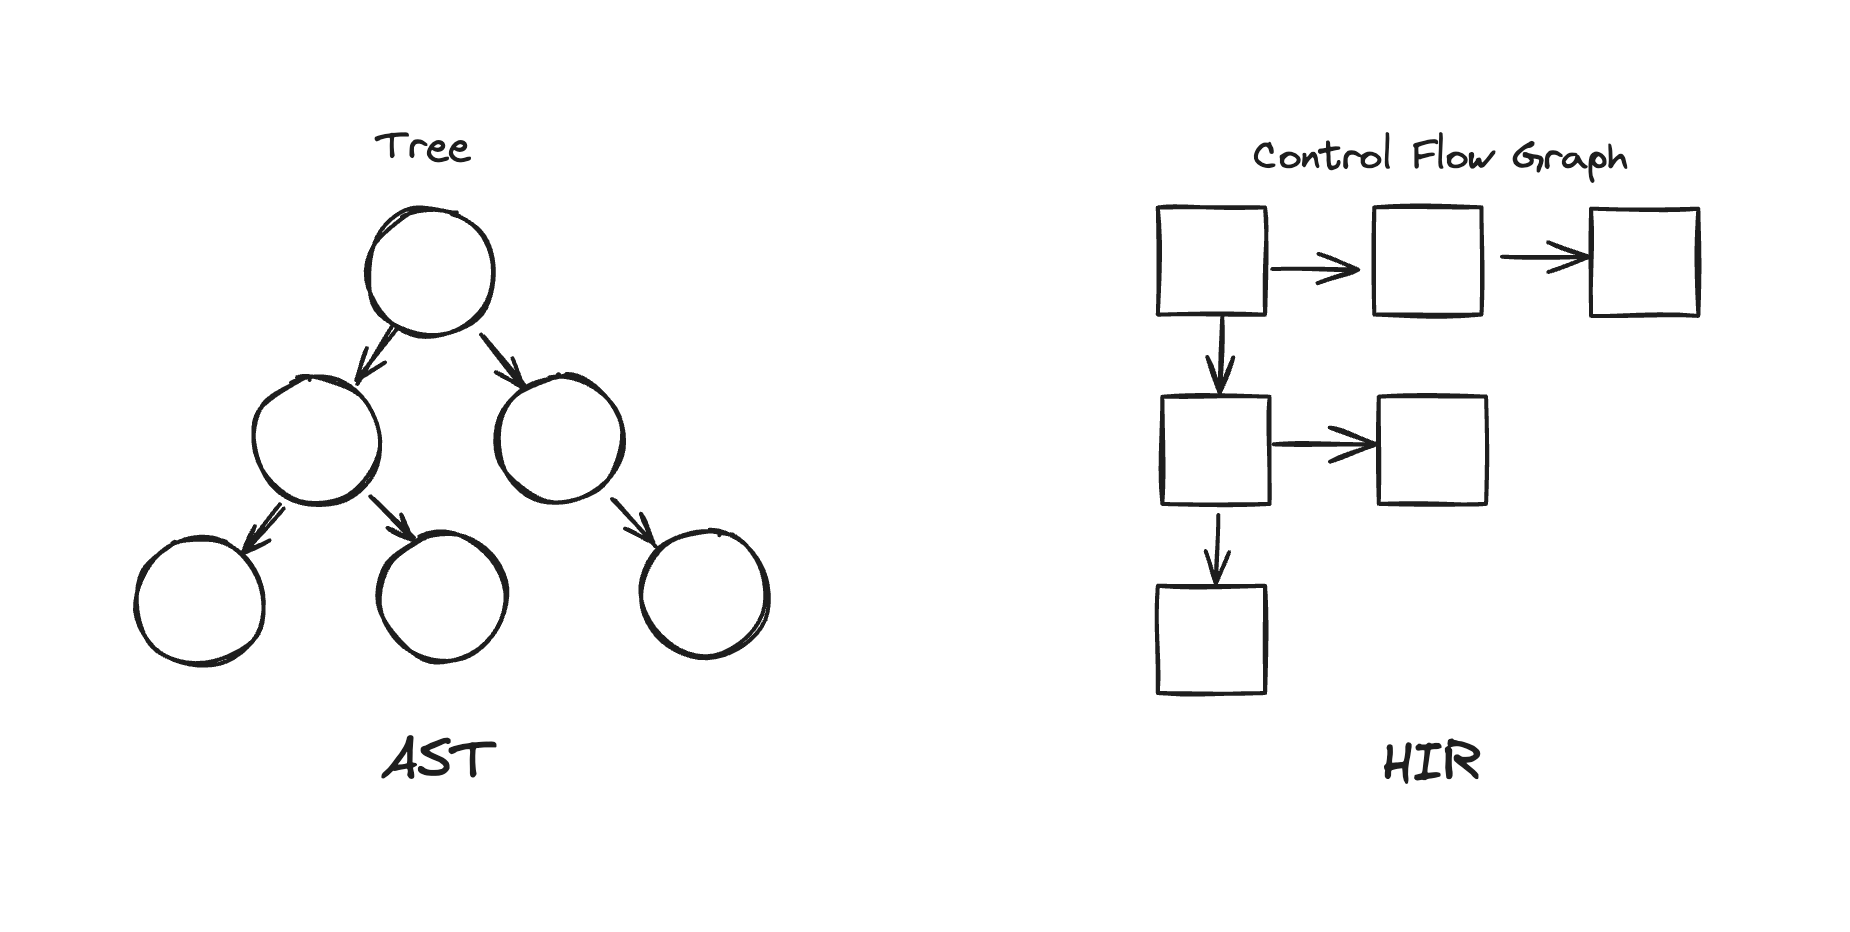
그림은 이렇게 그렸지만 각 노드는 서로 매칭되지 않는다.
이해를 돕기 위해 결과물을 먼저 살펴보자.
다음은 간단한 코드를 AST와 HIR로 변환한 결과물이다.
function Component({ color }: { color: string }) {
  if (color === "red") {
    return (<div styles={{ color }}>hello red</div>)
  } else {
    return (<div styles={{ color }}>hello etc</div>)
  }
}
이해를 돕기위한 예제 코드이다. Component 함수는 color가 red일 때와 아닐 때를 나누어 다른 JSX를 반환한다.
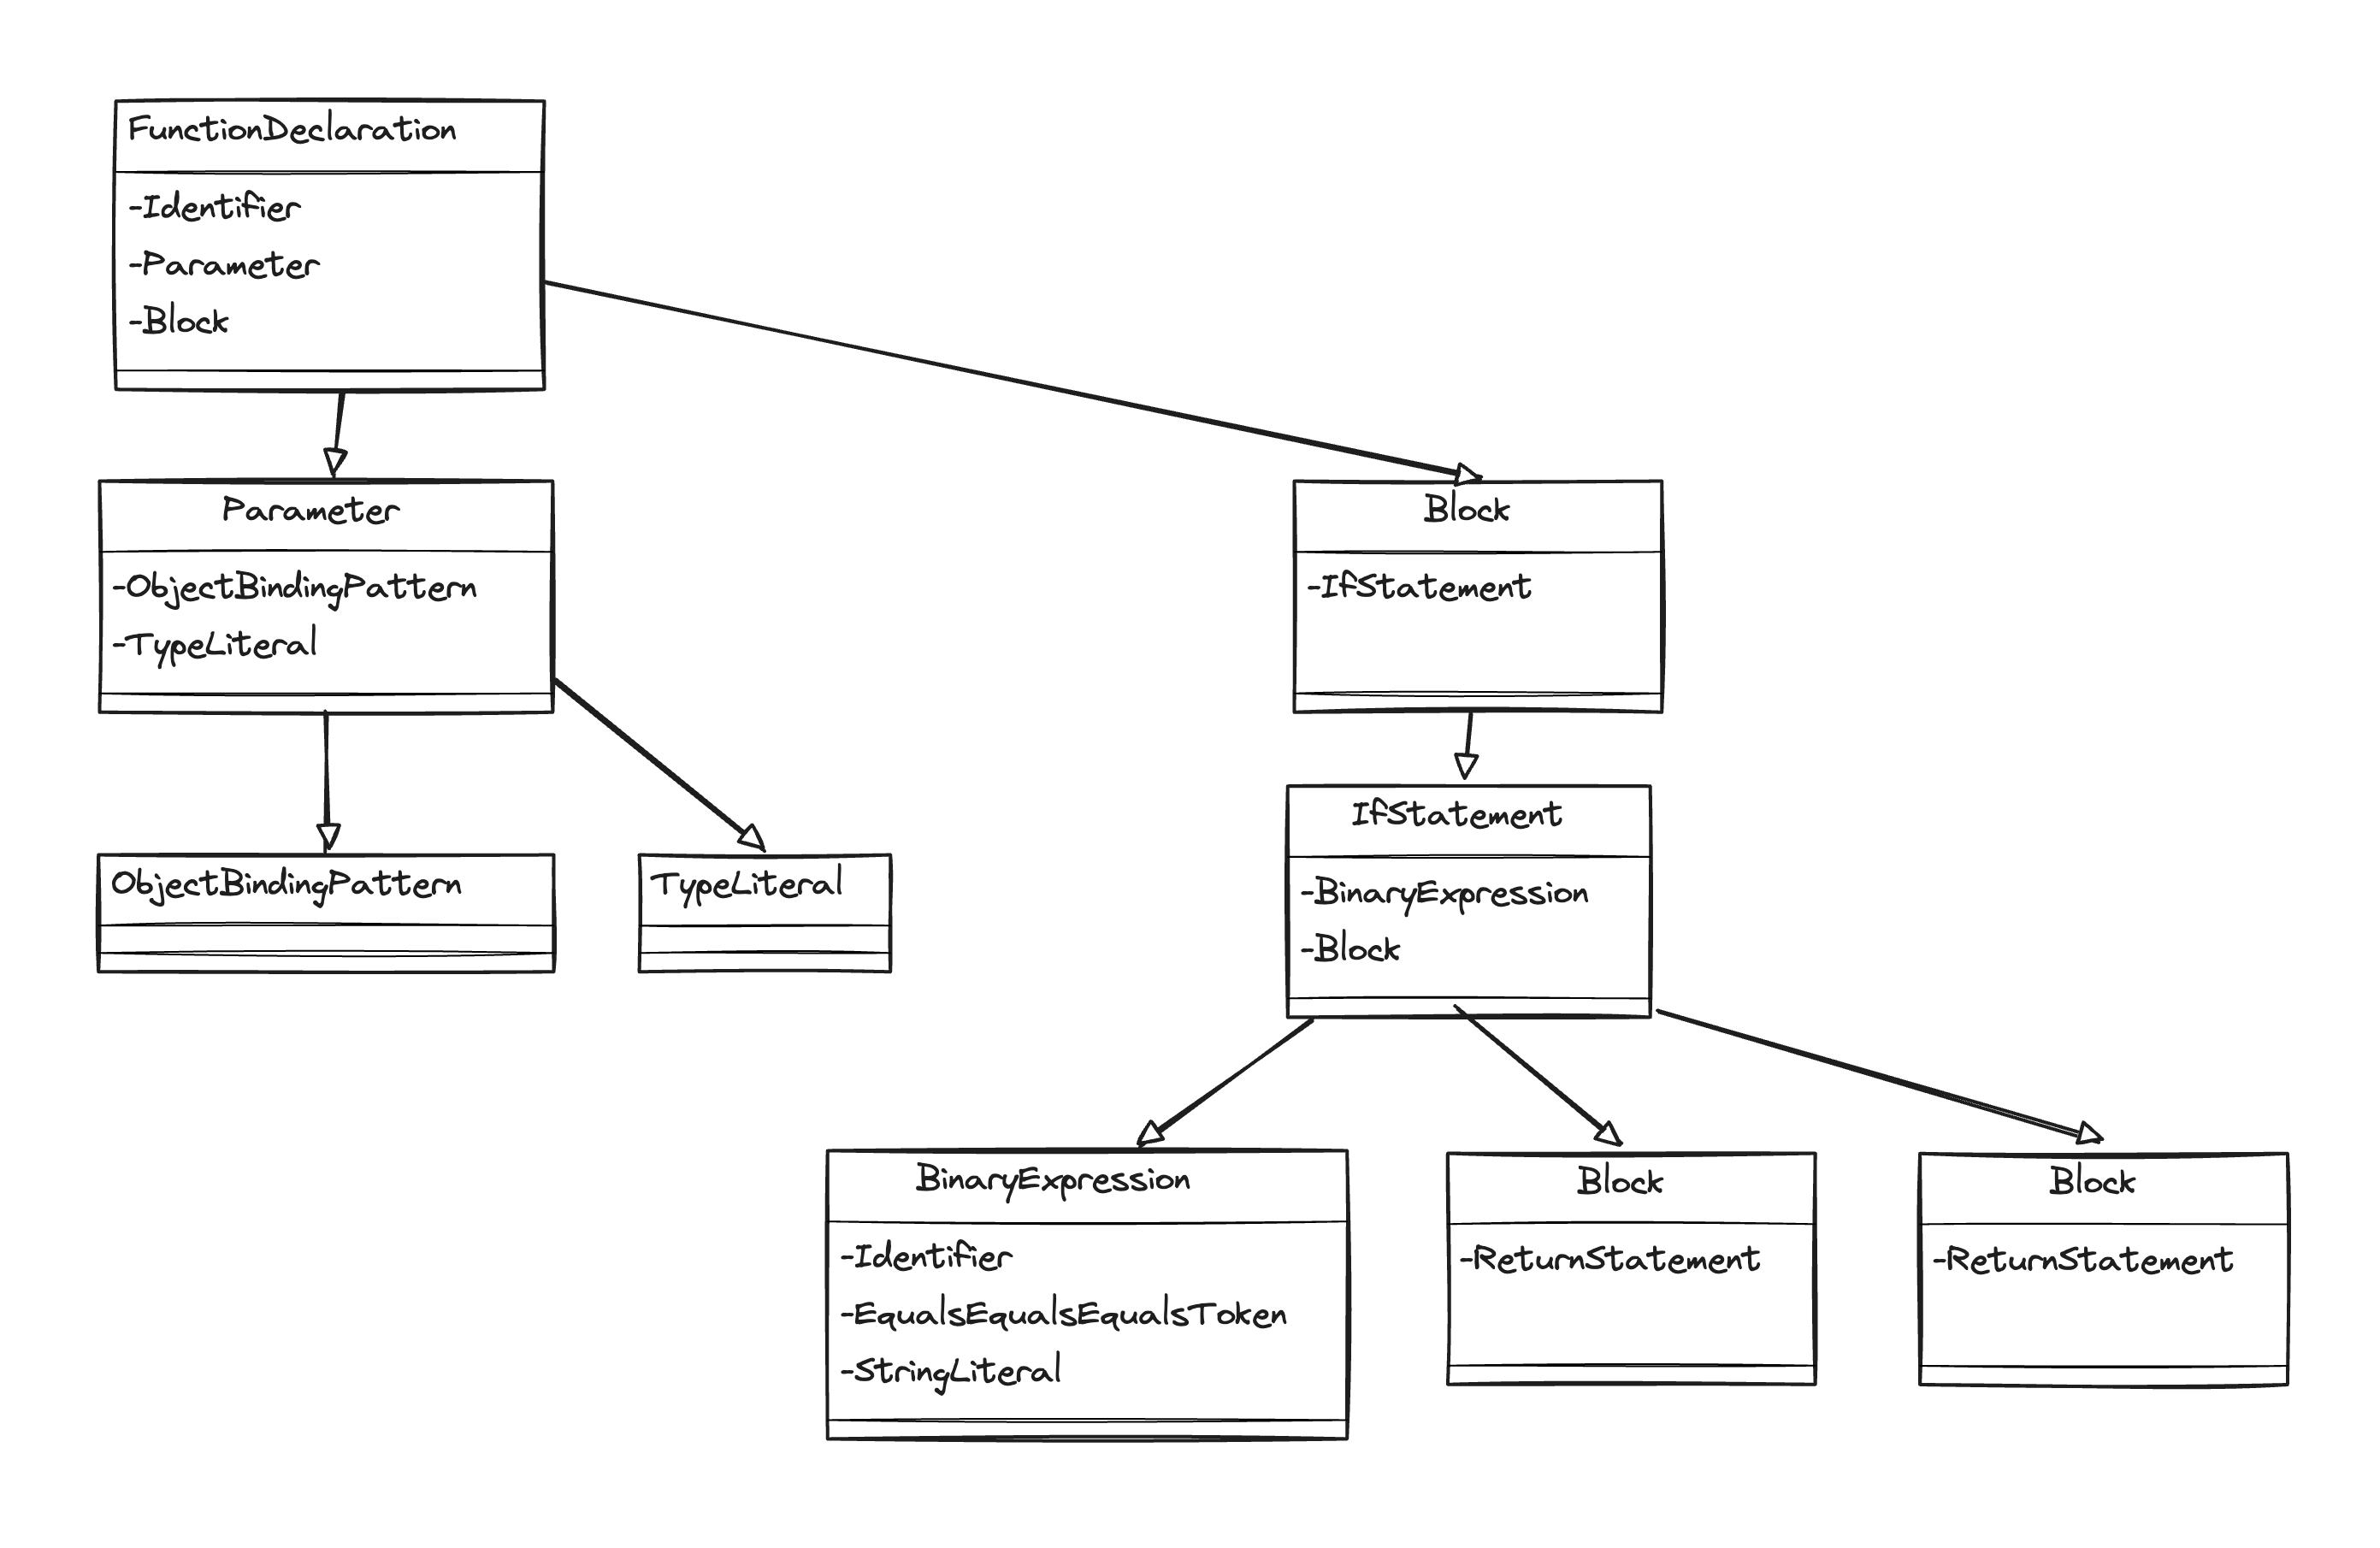
이 코드를 AST로 나타내면 다음과 같은 구문에 대한 트리로 표현 될 것이다.
// Component 함수
FunctionDeclaration
  Identifier
  Parameter
    ObjectBindingPattern
      BindingElement
        Identifier
    TypeLiteral
  Block
    IfStatement
      BinaryExpression
        Identifier
        EqualsEqualsEqualsToken
        StringLiteral
      Block
        ReturnStatement
          ParenthesizedExpression
            JsxElement
              JsxOpeningElement
                Identifier
                //...
//...
그래프로 표현하면 다음과 같다.
이제 이 AST를 HIR로 변환하면 다음과 같이 나온다.
function Component
bb0 (block):
  [1] <unknown> $2 = Destructure Let { color: <unknown> color$1 } = <unknown> $0
  [2] <unknown> $11 = LoadLocal <unknown> color$1
  [3] <unknown> $12 = "red"
  [4] <unknown> $13 = Binary <unknown> $11 === <unknown> $12
  [5] If (<unknown> $13) then:bb2 else:bb4 fallthrough=bb1
bb2 (block):
  predecessor blocks: bb0
  [6] <unknown> $3 = LoadLocal <unknown> color$1
  [7] <unknown> $4 = Object { color: <unknown> $3 }
  [8] <unknown> $5 = JSXText "hello red"
  [9] <unknown> $6 = JSX <div styles={<unknown> $4} >{<unknown> $5}</div>
  [10] Return <unknown> $6
bb4 (block):
  predecessor blocks: bb0
  [11] <unknown> $7 = LoadLocal <unknown> color$1
  [12] <unknown> $8 = Object { color: <unknown> $7 }
  [13] <unknown> $9 = JSXText "hello etc"
  [14] <unknown> $10 = JSX <div styles={<unknown> $8} >{<unknown> $9}</div>
  [15] Return <unknown> $10
bb1 (block):
  [16] Unreachable
여기서 코드를 이해하지 않아도 괜찮다. 훑어만 보자.
이 예제 코드에서의 제어흐름은 Component 함수 내의 if문이다. 그에 따라 Component 함수는 bb0, bb2, bb4 그리고 bb1 네 개의 기본 블럭으로 나뉘었다.
[5] If (<unknown> $13) then:bb2 else:bb4 fallthrough=bb1
이 부분을 보면 If문을 통해 bb2로 가는 경우와 bb4로 가는 경우, 그리고 fallthrough로 bb1로 가는 흐름이 표현되어 있다.
fallthrough는 if문을 통과한 후의 흐름을 나타낸다. 이 경우에는 도달 할 수 없는 코드로 표시되어 있다.
이해를 돕기 위해 그림으로 그려보면 아래와 같은 모습이다.
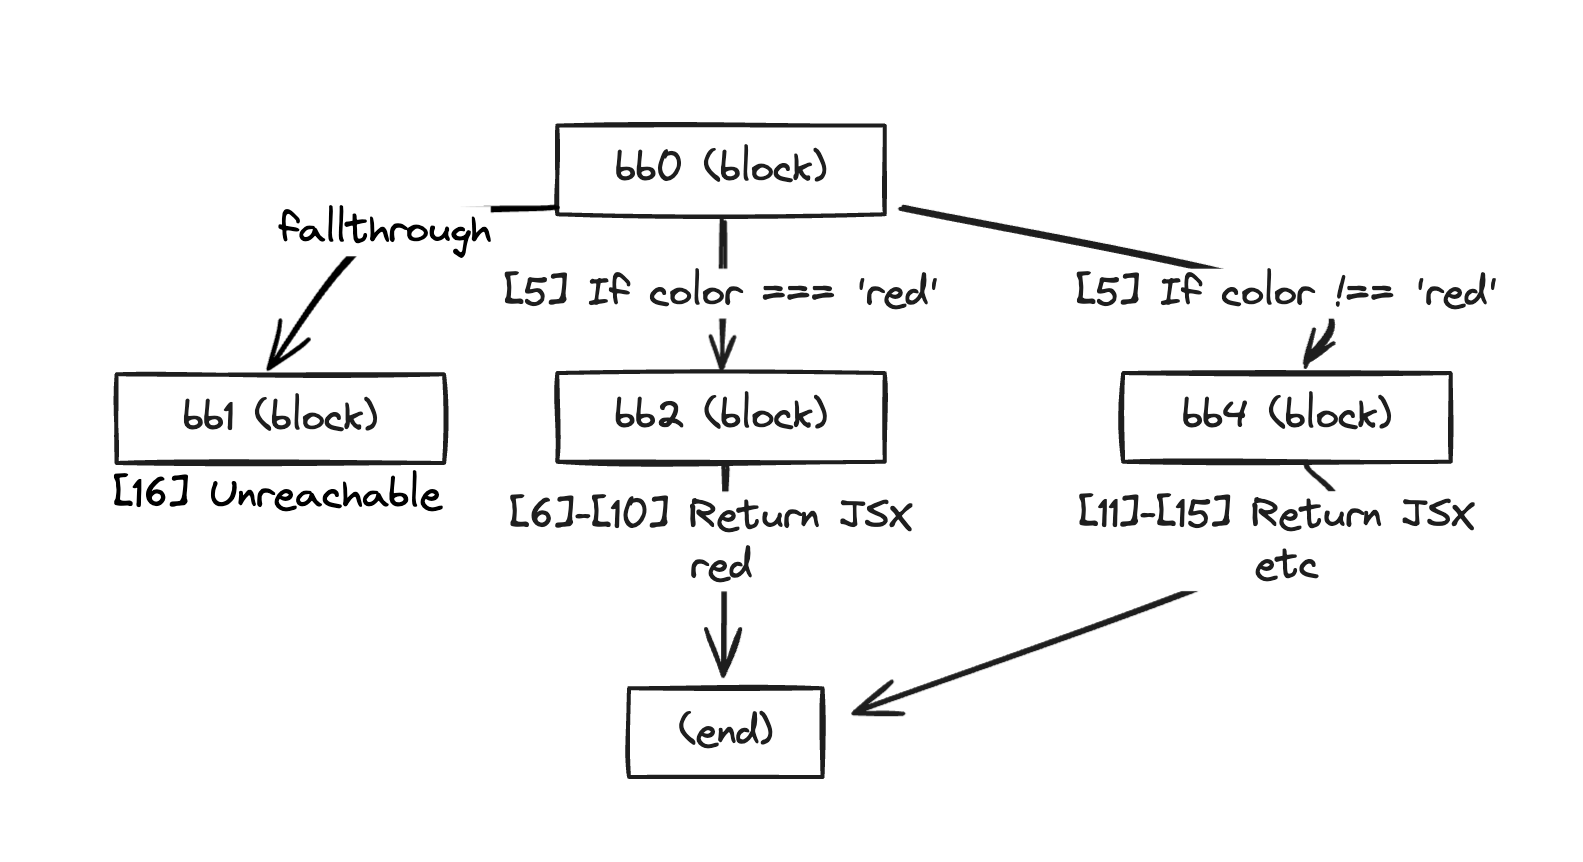
아~ 이제 어떤 모습으로 변환되는지 감이 오기 시작했다.
구문단위의 트리를 이런 형태의 제어 흐름에 따른 그래프로 표현하기위한 변환 과정이 Lowering이라는 것이다.
그리고 그 변환된 표현형태를 HIR라고 부른다. (React Compiler 에서)
중간 하차 지점
여기까지만 살펴보아도, HIR이 어떤 자료구조를 의미하는지 대략적으로 알 수 있어, 컴파일 과정을 이해하는데는 문제 없을 것이다.
그렇기에 다음 편으로 바로 이동해도 좋다.
Detach!
다시 lower 함수로
뒤에 이어서는 단순 지적 호기심으로 lowering 과정을 살펴보도록 하겠다. 모든 구문에 대한 lowering 과정이 포함되어있어. 코드 자체는 4,000줄 가량 된다.
그럼 차근차근 살펴보도록 하자.
다시 처음으로 돌아와 lower 함수를 살펴보자.
export function lower(
  func: NodePath<t.Function>,
  env: Environment,
  bindings: Bindings | null = null,
  capturedRefs: Array<t.Identifier> = [],
  // the outermost function being compiled, in case lower() is called recursively (for lambdas)
  parent: NodePath<t.Function> | null = null
): Result<HIRFunction, CompilerError> {}
lower 함수는 바벨에서 비롯된 NodePath<t.Function> 를 입력으로 받아 HIRFunction을 반환한다. (에러가 발생할 경우 CompilerError를 반환한다.)
기타 인자들로는, Environment 객체, Bindings, capturedRefs, parent 등이 있다.
이때 입력으로 들어오는 func의 단위는 어떤 것인가?
이전에 1편에서 살펴봤던 기억을 되살려보자.
program 노드의 traverse 메서드를 통해서 순회하면서 함수에 대한 노드를 찾아내고, 그 노드를 compileFn 함수에 넘겨주었다.
그렇기에 func는 바벨 AST로 부터 넘어오는 함수에 대한 노드가 될 것이다.
FunctionDeclaration, FunctionExpression, ArrowFunctionExpression 이렇게가 될 것이다.
이어서…
const builder = new HIRBuilder(env, parent ?? func, bindings, capturedRefs);
const context: Array<Place> = [];
HIRBuilder 인스턴스를 생성하여 할당해두고, context 배열을 초기화 한다. 함수 컨텍스트 정보를 담는 배열이다.
for (const ref of capturedRefs ?? []) {
  context.push({
    kind: "Identifier",
    identifier: builder.resolveBinding(ref),
    effect: Effect.Unknown,
    reactive: false,
    loc: ref.loc ?? GeneratedSource,
  });
}
capturedRefs 배열을 순회하며, context 배열에 Place 객체를 추가한다.
이부분은 재귀로 호출되는 경우이니 나중에 다시 보러오기로 하고 일단 넘어가자.
함수 이름 추출(식별자, Identifier)
함수가 FunctionDeclaration 또는 FunctionExpression인 경우, 함수의 id(Identifier) 식별자를 가져와 id 변수에 할당한다.
let id: string | null = null;
if (func.isFunctionDeclaration() || func.isFunctionExpression()) {
  const idNode = (
    func as NodePath<t.FunctionDeclaration | t.FunctionExpression>
  ).get("id");
  if (hasNode(idNode)) {
    id = idNode.node.name;
  }
}
FunctionDeclaration(함수 선언식) 노드와 FunctionExpression(함수 표현식) 노드는 식별자를 가질 수 있지만, ArrowFunctionExpression(화살표 함수) 노드는 식별자를 가질 수 없다.
// FunctionDeclaration
function foo() {}
// FunctionExpression
const foo = function bar() {}
// ArrowFunctionExpression
const foo = () => {}
인자 추출(Parameters)
함수의 인자를 추출하고, params 배열에 Place 객체를 추가한다.
params: Array<Identifier | Pattern | RestElement> (required)
params에는 Identifier, Pattern, RestElement가 올 수 있다.
Identifier는 식별자, Pattern은 객체나 배열 패턴, RestElement는 나머지 요소를 나타낸다.
const params: Array<Place | SpreadPattern> = [];
func.get("params").forEach((param) => {
  if (param.isIdentifier()) {}
  else if (param.isObjectPattern() || param.isArrayPattern() || param.isAssignmentPattern()) {}
  else if (param.isRestElement()) {}
  else {}
  // ...
});
Identifier(단일 변수 이름)
// 예시
const greet = function(name) { // name이 Identifier
  console.log(`Hello, ${name}!`);
};
인자가 Identifier인 경우, Place 객체를 생성하여 params 배열에 추가한다.
if (param.isIdentifier()) {
  const binding = builder.resolveIdentifier(param);
  const place: Place = {
    kind: "Identifier",
    identifier: binding.identifier,
    effect: Effect.Unknown,
    reactive: false,
    loc: param.node.loc ?? GeneratedSource,
  };
  params.push(place);
}
앞으로 자주 등장할 것인데 Place 객체는 다음과 같이 정의되어 있다.
/*
 * 데이터를 읽거나 쓸 수 있는 장소:
 * - 변수(식별자)
 * - 식별자로의 경로
 */
export type Place = {
  kind: "Identifier"; // 종류
  identifier: Identifier; // 식별자
  effect: Effect; // The effect with which a value is modified. (수정된 값의 효과)
  reactive: boolean;
  loc: SourceLocation;
};
ObjectPattern(객체 패턴), ArrayPattern(배열 패턴), AssignmentPattern(할당 패턴)
// 예시
// ObjectPattern
const greet = function({ name }) {
  console.log(`Hello, ${name}!`);
};

// ArrayPattern
const greet = function([name]) {
  console.log(`Hello, ${name}!`);
};

// AssignmentPattern
const greet = function(name = 'world') {
  console.log(`Hello, ${name}!`);
};
인자가 ObjectPattern, ArrayPattern, AssignmentPattern인 경우, 임시 변수를 생성하고 Place 객체를 생성하여 params 배열에 추가한다.
lowerAssignment 함수를 통해 할당을 처리한다.
else if (
  param.isObjectPattern() ||
  param.isArrayPattern() ||
  param.isAssignmentPattern()
) {
  const place: Place = {
    kind: "Identifier",
    identifier: builder.makeTemporary(),
    effect: Effect.Unknown,
    reactive: false,
    loc: param.node.loc ?? GeneratedSource,
  };
  params.push(place);
  lowerAssignment(
    builder,
    param.node.loc ?? GeneratedSource,
    InstructionKind.Let,
    param,
    place,
    "Assignment"
  );
}
RestElement(나머지 요소)
// 예시
const greet = function(...names) {
  console.log(`Hello, ${names.join(', ')}!`);
};
인자가 RestElement인 경우, 임시 변수를 생성하고 Spread 객체를 생성하여 params 배열에 추가한다.
else if (param.isRestElement()) {
  const place: Place = {
    kind: "Identifier",
    identifier: builder.makeTemporary(),
    effect: Effect.Unknown,
    reactive: false,
    loc: param.node.loc ?? GeneratedSource,
  };
  params.push({
    kind: "Spread",
    place,
  });
  lowerAssignment(
    builder,
    param.node.loc ?? GeneratedSource,
    InstructionKind.Let,
    param.get("argument"),
    place,
    "Assignment"
  );
}
이렇게 함수의 인자를 추출하고 params 배열에 Place 객체를 추가하는 과정을 거친다.
이제 함수의 본문을 추출하고, body 배열에 Instruction 객체를 추가하는 과정을 살펴보자.
함수 본문 추출(Body)
let directives: Array<string> = [];
const body = func.get("body");
함수의 본문을 추출하고, directives 배열을 초기화한다.
Expression(표현식)
if (body.isExpression()) {
  const fallthrough = builder.reserve("block");
  const terminal: ReturnTerminal = {
    kind: "return",
    loc: GeneratedSource,
    value: lowerExpressionToTemporary(builder, body),
    id: makeInstructionId(0),
  };
  builder.terminateWithContinuation(terminal, fallthrough);
}
BlockStatement(블록문)
블럭문일 경우, lowerStatement 함수를 통해 body를 처리한다.
else if (body.isBlockStatement()) {
  lowerStatement(builder, body);
  directives = body.get("directives").map((d) => d.node.value.value);
}
이 부분이 사실 코어한 부분이라고 볼 수 있다.
lowerStatement 함수를 살펴보자.
function lowerStatement(
  builder: HIRBuilder,
  stmtPath: NodePath<t.Statement>,
  label: string | null = null
): void {
  const stmtNode = stmtPath.node;
  switch (stmtNode.type) {
    case "ThrowStatement":
    case "ReturnStatement":
    case "IfStatement":
    case "BlockStatement":
    case "BreakStatement":
    case "ContinueStatement":
    case "ForStatement":
    case "WhileStatement":
    case "LabeledStatement":
    case "SwitchStatement":
    case "VariableDeclaration":
    case "ExpressionStatement":
    case "DoWhileStatement":
    case "FunctionDeclaration":
    case "ForOfStatement":
    case "ForInStatement":
    case "DebuggerStatement":
    case "EmptyStatement":
    case "TryStatement":
    // ------- skip -------
    case "TypeAlias":
    case "TSTypeAliasDeclaration":

    // --- unsupported ---
    case "ClassDeclaration":
    // ~
    case "WithStatement":
    default:
stmtPath(Statement Path)의 노드 타입에 따라 다양한 처리를 한다.
lower함수에 의해서 호출될 때, stmtPath는 BlockStatement가 들어올 것이다. 그럼 예시를 통해서 살펴보자.
// 예시
function complexExample(x) {
  let result = 0;
  if (x > 0) {
    result = x * 2;
  } else {
    result = x * 3;
  }
  return result;
}
함수 complexExample의 body는 BlockStatement이다. 이 BlockStatement를 lowerStatement 함수에 넘겨보자.
case "BlockStatement": {
  const stmt = stmtPath as NodePath<t.BlockStatement>;
  const statements = stmt.get("body");
stmtPath를 BlockStatement로 타입 캐스팅하고, body를 추출한다.
body는 NodePath<t.Statement>[] 타입으로, 블록문 내의 각 문장을 나타낸다.
for (const s of statements) {
  lowerStatement(builder, s);
}
statements들을 순회 하면서, lowerStatement 함수를 재귀적으로 호출한다.
blockStatment 처리 중에 재귀적으로 처리하는 과정말고도 다른 과정이 하나 더 있다.
‘const’ 변수 선언의 Hoisting 처리
먼저 어떤 바인딩이 선언되기 전에 참조될 경우 호이스팅될 수 있는지 확인한 뒤,
해당 선언을 참조되는 가장 빠른 지점(즉, 바로 앞의 최상위 문)으로 컨텍스트 변수로 호이스팅한다.\
const hoistableIdentifiers: Set<t.Identifier> = new Set();

for (const [, binding] of Object.entries(stmt.scope.bindings)) {
  // refs to params are always valid / never need to be hoisted
  if (binding.kind !== "param") {
    hoistableIdentifiers.add(binding.identifier);
  }
}
hoistableIdentifiers라는 Set을 생성하고, stmt.scope.bindings를 순회하며
identifier 들을 hoistableIdentifiers에 추가한다.
stmt.scope.bindings는 현재 블록의 바인딩 정보를 담고 있다.
부모나 자식 블록의 바인딩 정보는 포함하지 않는다.
이때, const, let, var이 hoistableIdentifiers에 추가된다.
각 문을 순회할때, 호이스팅이 필요한 요소들을 넣을 willHoist라는 Set을 생성한다.
for (const s of statements) {
  const willHoist = new Set<NodePath<t.Identifier>>();
  // ...
}
함수 컨텍스트의 깊이를 추적한다. 식별자 참조가 내부 함수에서 발생하는지 추적하기 위해서이다.
traverse를 통해 탐색하면서 FunctionExpression, FunctionDeclaration, ArrowFunctionExpression, ObjectMethod 노드를 만나면 함수 깊이를 증가시키고, 노드를 빠져나오면 함수 깊이를 감소시킨다.
let fnDepth = s.isFunctionDeclaration() ? 1 : 0;
const withFunctionContext = {
  enter: (): void => {
    fnDepth++; // 함수 깊이 증가
  },
  exit: (): void => {
    fnDepth--; // 함수 깊이 감소
  },
};
s.traverse({
  FunctionExpression: withFunctionContext, // 함수 표현식
  FunctionDeclaration: withFunctionContext, // 함수 선언식
  ArrowFunctionExpression: withFunctionContext,  // 화살표 함수
  ObjectMethod: withFunctionContext, // 객체 메서드
  // ...
});
문을 순회하면서, 식별자를 찾는다.
식별자가 참조되지 않거나, 부모가 할당 표현식이 아닌 경우, 넘어간다.
식별자가 참조되고 hoistableIdentifiers에 있으며, 함수 깊이가 0보다 크거나 바인딩이 hoisted인 경우, willHoist에 추가한다.
s.traverse({
  // ...
  Identifier(id: NodePath<t.Identifier>) {
    const id2 = id;
    if (
      !id2.isReferencedIdentifier() &&
      // isReferencedIdentifier is broken and returns false for reassignments
      id.parent.type !== "AssignmentExpression"
    ) {
      return;
    }
    const binding = id.scope.getBinding(id.node.name);
    /*
    * 식별자 선언을 호이스트할 수 있는 경우는 다음과 같습니다.
    * 1. 참조가 내부 함수 내에서 발생하는 경우
    * 또는
    * 2. 선언 자체가 호이스트 가능한 경우
    */
    if (
      binding != null &&
      hoistableIdentifiers.has(binding.identifier) &&
      (fnDepth > 0 || binding.kind === "hoisted")
    ) {
      willHoist.add(id);
    }
  },
});
이후 다시 노드를 순회하면서, hoistableIdentifiers에 있는 식별자를 삭제한다.
s.traverse({
  Identifier(path: NodePath<t.Identifier>) {
    if (hoistableIdentifiers.has(path.node)) {
      hoistableIdentifiers.delete(path.node);
    }
  },
});
willHost를 순회하면서, identifier를 resolveIdentifier를 통해 고유한 식별자로 변환하고,
lowerValueToTemporary 함수 통해 임시변수에 DeclareContext를 생성하고 builder에 push한다.
이후 전역 환경의 #contextIdentifiers, #hoistedIdentifiers에 추가한다.
// Hoist declarations that need it to the earliest point where they are needed
for (const id of willHoist) {
  const binding = stmt.scope.getBinding(id.node.name);
  if (builder.environment.isHoistedIdentifier(binding.identifier)) {
    // Already hoisted
    continue;
  }
  const identifier = builder.resolveIdentifier(id);
  const place: Place = {
    effect: Effect.Unknown,
    identifier: identifier.identifier,
    kind: "Identifier",
    reactive: false,
    loc: id.node.loc ?? GeneratedSource,
  };
  lowerValueToTemporary(builder, {
    kind: "DeclareContext",
    lvalue: {
      kind: InstructionKind.HoistedConst,
      place,
    },
    loc: id.node.loc ?? GeneratedSource,
  });
  builder.environment.addHoistedIdentifier(binding.identifier);
나중에 코드 생성 전에 DeclareContext를 제거하고 연관된 StoreContext를 다시 변환하여 원래 소스 코드를 복원한다.
다른 종류의 선언에 대한 호이스팅은 향후 구현될 예정이다.
호이스팅(Hoisting)을 하는 이유가 뭘까?
그런데, 이번에 살펴본 것은 컴파일러가 하는 호이스팅이다.
const 호이스팅을 해주는 이유는, 뭘까? 예시와 함께 살펴보자. 테스트 코드를 통해 보면 양질의 예시를 얻을 수 있다. /src/__tests__/fixtures/compiler 로 이동해보자.
간결해보이는 코드 하나를 줏었다. “hoisting-simple-const-declaration.expected.md” 파일을 열어보자.
function hoisting() {
  const foo = () => {
    return bar + baz;
  };
  const bar = 3;
  const baz = 2;
  return foo(); // OK: called outside of TDZ for bar/baz
}
간단한 호이스팅 예제이다. 이걸 HIR로 변환하면 아래와 같이 변한다.
function hoisting
bb0 (block):
  [1] <unknown> $1 = DeclareContext HoistedConst <unknown> bar$0
  [2] <unknown> $3 = DeclareContext HoistedConst <unknown> baz$2
  [3] <unknown> $4 = LoadContext <unknown> bar$0
  [4] <unknown> $5 = LoadContext <unknown> baz$2
  [5] <unknown> $10 = Function  @deps[<unknown> $4,<unknown> $5] @context[<unknown> bar$0,<unknown> baz$2] @effects[]:
      bb1 (block):
        [1] <unknown> $6 = LoadContext <unknown> bar$0
        [2] <unknown> $7 = LoadContext <unknown> baz$2
        [3] <unknown> $8 = Binary <unknown> $6 + <unknown> $7
        [4] Return <unknown> $8
  [6] <unknown> $12 = StoreLocal Const <unknown> foo$11 = <unknown> $10
  [7] <unknown> $13 = 3
  [8] <unknown> $14 = StoreContext Reassign <unknown> bar$0 = <unknown> $13
  [9] <unknown> $15 = 2
  [10] <unknown> $16 = StoreContext Reassign <unknown> baz$2 = <unknown> $15
  [11] <unknown> $17 = LoadLocal <unknown> foo$11
  [12] <unknown> $18 = Call <unknown> $17()
  [13] Return <unknown> $18
맨 위의DeclareContext HoistedConst를 통해 bar, baz가 호이스팅 되었음을 알 수 있다.
흠 여기까지 봤을땐 딱히 뭔가 와닿는 것이 없다.
그렇다면 이제 호이스팅을 다 끄고 생성해보자. 전부 주석처리 하고 컴파일러를 다시 돌려보았다.
// 😴
case "BlockStatement": {
  const stmt = stmtPath as NodePath<t.BlockStatement>;
  const statements = stmt.get("body");
  // const hoistableIdentifiers: Set<t.Identifier> = new Set();
  // for (const [, binding] of Object.entries(stmt.scope.bindings)) {
  //   // refs to params are always valid / never need to be hoisted
  //   if (binding.kind !== "param") {
  //     hoistableIdentifiers.add(binding.identifier);
  //   }
  // }

  for (const s of statements) {
    // const willHoist = new Set<NodePath<t.Identifier>>();
    // /*
    //  * If we see a hoistable identifier before its declaration, it should be hoisted just
    //  * before the statement that references it.
    //  */
    // let fnDepth = s.isFunctionDeclaration() ? 1 : 0;
    // const withFunctionContext = {
    //   enter: (): void => {
    //     fnDepth++;
    //   },
    //   exit: (): void => {
    //     fnDepth--;
    //   },
    // ...
    lowerStatement(builder, s);
  }
우선 이런 에러가 발생했다.
Todo: [hoisting] EnterSSA: Expected identifier to be defined before being used. \
Identifier bar$0 is undefined (5:5)
뭔가 달라졌다. bar$0이 정의되기 전에 사용되었다는 에러가 발생했다.
HIR 코드도 살펴보자. 어떤 차이가 생겼을까?
function hoisting
bb0 (block):
  [1] <unknown> $1 = LoadLocal <unknown> bar$0
  [2] <unknown> $3 = LoadLocal <unknown> baz$2
  [3] <unknown> $8 = Function  @deps[<unknown> $1,<unknown> $3] @context[<unknown> bar$0,<unknown> baz$2] @effects[]:
      bb1 (block):
        [1] <unknown> $4 = LoadLocal <unknown> bar$0
        [2] <unknown> $5 = LoadLocal <unknown> baz$2
        [3] <unknown> $6 = Binary <unknown> $4 + <unknown> $5
        [4] Return <unknown> $6
  [4] <unknown> $10 = StoreLocal Const <unknown> foo$9 = <unknown> $8
  [5] <unknown> $11 = 3
  [6] <unknown> $12 = StoreLocal Const <unknown> bar$0 = <unknown> $11
  [7] <unknown> $13 = 2
  [8] <unknown> $14 = StoreLocal Const <unknown> baz$2 = <unknown> $13
  [9] <unknown> $15 = LoadLocal <unknown> foo$9
  [10] <unknown> $16 = Call <unknown> $15()
  [11] Return <unknown> $16
오… DeclareContext HoistedConst가 사라졌다. 이건 당연하겠지. 호이스팅을 하지 않았으니까.
그로인해 [1] 에서 정의되기 전에 LoadLocal이 발생하여 에러가 발생한 것이다. 뒤늦게 [6], [8],에서 StoreLocal Const로 정의되었지만, 이미 사용되었기 때문에 에러가 발생했다.
javascript가 실행되는 환경에서는 엔진이 호이스팅을 해주지만, HIR로 변환되고나면 다른 언어로 변환된 것이나 다름없다. 그렇기에, 최대한 javascript를 모델링하여야 했던 것이지 않을까 싶다. 그외에도 이로인해 DCE나 Const Propagation 등 다른 최적화 과정에서도 나중에 활용할 수 있지 않을까 싶은 생각을 남겨본다.
그래서 궁금해서 Compiler 개발자 lauren 에게 물어보았다. 질문을 던지고나서야 머쓱하게 예제 코드를 찾아보게 되었고 구현이 필연적이었음을 알게 되었다.
(질문 앞쪽이 하나 잘리긴했는데)
it’s more because it’s a todo 🤣 const hoisting was the most straightforward to support, and at the moment it’s not used in any other passes
— lauren 나은 (@potetotes) June 9, 2024
요런 친절한 답변을 받았다. 궁금할 때 바로 질문 해볼 수 있는 용기가(?) 조금 생긴 것 같다.
const hoisting이 가장 간단하게 지원할 수 있는 형태였기에, 먼저 구현 되었고, 아직 다른 최적화 과정에서 사용되지 않았다고 한다.
그렇다면, 이제 다시 lowerStatement 함수로 돌아가서, 다른 부분을 살펴보도록 하자.
이제 재귀적으로 돌면서 각케이스에 맞는 lowering을 수행할 것이다. 이 것을 다 적고 있노라면, 읽는 이도 지루할 것 같아서. 다음에 짤막하게 몇개만 살펴보거나 이번 글에 나중에 첨부해두겠다.
쨋든 재귀적으로 body 부분을 lowering 하고 나면 아래로 빠져나오게 된다.
builder.terminate(
  {
    kind: "return",
    loc: GeneratedSource,
    value: lowerValueToTemporary(builder, {
      kind: "Primitive",
      value: undefined,
      loc: GeneratedSource,
    }),
    id: makeInstructionId(0),
  },
  null
);

return Ok({
  id,
  params,
  fnType: parent == null ? env.fnType : "Other",
  returnType: null, // TODO: extract the actual return type node if present
  body: builder.build(),
  context,
  generator: func.node.generator === true,
  async: func.node.async === true,
  loc: func.node.loc ?? GeneratedSource,
  env,
  effects: null,
  directives,
});
builder.terminate를 통해 return을 생성하고, builder.build()를 통해 생성하여 반환한다.
그렇게 HIRFunction을 반환하게 된다.
const hir = lower(func, env).unwrap();
HIR롤 변환하는 과정에서 builder가 많은 역할을 하는데, 이는 깊게 살펴보지 못했다. 이는 다음에 더 구체적으로 살펴보도록 하겠다.
마무리
이번 글에서는 lower 함수를 살펴보았다.
lower함수는 바벨 AST로 부터HIRFunction을 반환하는 함수이다.- 함수의 인자, 식별자, 본문을 추출하고
HIRBuilder를 통해Instruction객체를 생성한다. const변수 선언의 호이스팅을 처리한다.lowerStatement함수를 통해 각종 문을 처리한다.lower함수는 재귀적으로 호출되며, 함수의 본문을 처리하고HIRFunction을 반환한다.
그럼 안녕!
이용한 툴
참고자료